Today our course was introduced to lighting diagrams and how to create them online using free software.
I have used this software before in my previous years of college, and it came in very useful to remember what kind of set ups I used in the studio. This way I could look back at them and re-use them and re-create setups if I ever needed too. Using this software you can create lighting set ups with a variety of different backgrounds, subjects, light sources, light modifiers, reflectors and props/accessories.
To create your own diagrams:
Make sure you have the correct information, so when using a studio set up, record your camera settings, where lights were placed and positioned.
You will then be faced with a default set up (shown below)
You can clear this section by clicking on the ‘clear the diagram’ section just above the image, and the screen will look like this (see below)
On the left hand side, there is a grey bar full of the tools you may have used in the shoot which you can add into the diagram.
After looking around the software and getting an idea of what the selections are, you can select objects, drag and rotate them so that you create your desired set up.
Once finished with the set up, you can the export your diagram into a PNG, PJEG, or URL file.
After you have exported your diagram, you can do as you wish with it. A really useful way to edit your diagram further is to edit it in Photoshop. This way you can add in extra details that the software doesn’t allow you to do, such as add in camera settings, distance from props and lighting. During the lecture, I created the following set up and edited in Photoshop:
To begin our lecture today, we were introduced to this image (see below).
This image here was created by Dean Collins, and we were asked to look at it and think about the lighting used and how it was created. We then followed on by watching a video by Collins where he explains what he did to create this image to get an insight on the different lighting techniques used.
After watching this video, my mind was blown! The use of language used to explain and express lighting techniques was astonishing. Dean Collins made the procedure so so scientific and complicated, and at my level I’m not expected to be able to talk like Dean Collins.
Another video we were shown was by Nick Knight who is a fashion and documentary photographer. This video was created for Topshop for promotional purposes. Video shown below:
Whilst watching this, we were made to keep track of any lighting situations we might aspire too or would like to try out. Below are some screenshots of the lightings that I liked from the video and a lighting diagram of how I think they may have been created:
The light shining on the background would highlight the the background in the photograph, causing it to be pure white, and then the side light would highlight the models face. By using a reflector it would stop shadows casting on the other side of the face. However, the light facing the model would need to be on ah high setting so that it could cast a shadow in the background.
From this task, I thought that it was clear that throughout the film and media industry, the use of lighting is very simple if used correctly. When creating your shot, whether it be still photography or moving image, the colour temperature must be considered, this helps create the mood and atmosphere to a photograph. To understand better the colour temperature, we use the Kelvin Scale (shown below)
The scale indicates the different light tones you come across by using natural and artificial lighting. These lights are used widely for all types of photography, but sometimes when you need a certain colour temperature you use equipment such as gels and filters. These give a different colour to the image, thus creating a new atmosphere for the image. The use of reflectors is also useful for creating certain colour temperatures. If you use a gold reflector then the light will be warm, silver and white reflectors are very clean, ‘pure’ lights so appear cooler.
The photographer Philip-Lorca Dicorcia works with light to help symbolise certain situations in life within his photographs. Such as the image below:
The natural sunlight was used to highlight the red areas of the photograph to symbolise that this image was taken in the Red Light District. The model within the image is also a prostitute, which is known in the Red Light District. Dicorcia would pay the prostitutes the same amount they would charge just so that he could photograph them how he wished. The lighting
This next image is by photographer and lecturer Paul Smith, and the lighting used here was from a tungsten bulb, this was because this gives a warm lighting. If this image had a cool colour temperature, the colour of the sick in the sink and toilet wouldn’t be as vibrant. The reasoning behind this colour temperature is to create a mood and atmosphere to the image. This image repulses us, makes you feel sick, by making the colours look and seem more realistic to the eye.
Andres Serrano is another example of using light in a specific way in this image of ‘Piss Christ’ in 1987
It depicts a small plastic crucifix being submerged into a glass of his own urine. Looking at how the light has given a different aesthetic to the heavenly light from the top part of the image. However, if you know the real context behind the image, you feel repulsed as the crucifix is immersed int he urine and you question why.
The next images by Tim Noble and Sue Webster consist of using light creatively to cast light onto objects to create accurate silhouettes of people. These were all made from rubbish and assembled with accuracy. This body of work was inspired by Tim Noble’s father’s death. When he was a child he would be scared by shadows casted by old stuffed animals. So he tried to turn this into art by creating shadows from old junk.
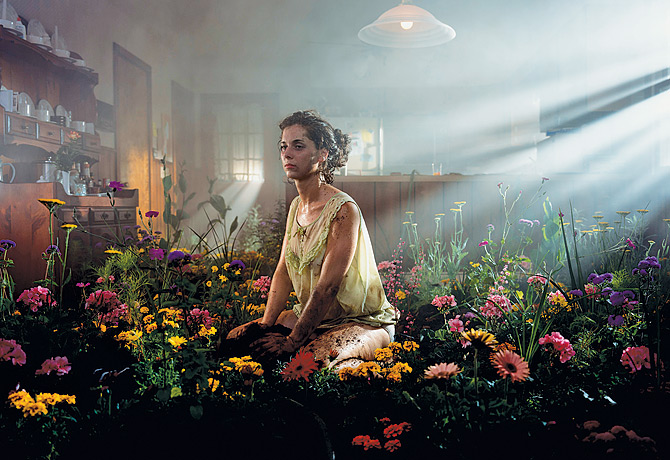
Gregory Crewdson is a well known photographer who uses extravagant lighting set ups to take still photographs. The set ups look like movie scenes but he only does still images.
This lecture went through a wide variety of photographers who use interesting uses of light, and they all interlink with how they approach their subjects. From today I have learnt that there are 3 main types on lighting, natural, blended and artificial, which all give out and create moods and atmospheres. To find the correct one, practise is needed and archiving the outcomes and the settings used. Light creates the image and helps to give more depth, rather than making the image appear flat and plain.
For one of the tasks over easter, we were to collect items that are red and this got me thinking, why are earth would we need red items? I thought maybe it was to do with a still life set up in the studio. However, this wasn’t the case, we were just told to bring these items so we could do a still life drawing task. These items were set out onto a table and a spotlight set on them so that it would cast shadows. By using a blank piece of paper and charcoal, I was able to create a black piece of paper with a removable substance on top. This was so that I could rub out the charcoal and pin point the highlights and shadowed areas of the objects in front of me.
Here is my drawing:
This task was fun, but it also made me realise how light works and and how it effects objects. With the candle placed in front of me and the light coming from the back of the candle, it casted a shadow in the foreground. This task made me think more about the highlights and shadows rather than the object itself.


 The scale indicates the different light tones you come across by using natural and artificial lighting. These lights are used widely for all types of photography, but sometimes when you need a certain colour temperature you use equipment such as gels and filters. These give a different colour to the image, thus creating a new atmosphere for the image. The use of reflectors is also useful for creating certain colour temperatures. If you use a gold reflector then the light will be warm, silver and white reflectors are very clean, ‘pure’ lights so appear cooler.

.jpg/220px-Piss_Christ_by_Serrano_Andres_(1987).jpg)